Placemats

For a while, I’ve had the idea of laminating paper menus from some of our favorite restaurants so that our children can have something different at each meal to use as a placemat.

Chez FonFon Menu, 2008

Av got them laminated for us, and they turned out great!

We’ve got placemats now from Bright Star, Lusco’s, Attman’s, Cotton Patch, Walnut Hills, Primo’s, McGuire’s, Stamps Superburger…

Laminated Menus

Niki’s West, Mary Mac’s, Wintzell’s, Schwartz’s in Montreal, Faidley’s in Baltimore, the old Sal and Sam’s, even a peach pie wrapper from The Varsity that I guess can be a drink coaster…

Laminated Menus

Hopefully when they get older the boys will have a good time deciding which placemat to use – and it will give them something to practice reading with too.

—
I’ve also been saving mayonnaise and applesauce jars for catching lightning bugs!

RC and Moon Pie Festival, Bell Buckle Tennessee

This weekend, we drove up to Bell Buckle, Tennessee for the RC and Moon Pie Festival. We got to see some of the contests – there was the RC dash, where contestants walk with cans of RC on their head, and the watermelon seed-spitting contest. All day, there were different activities: a race, people clogging, a RC-Moon Pie recipe contest, a wading pool play called “A Midsummer’s Nightmare” where GooGoo Cluster tries to steal RC Cola from Moon Pie, and towards the end of the day, the largest Moon Pie is cut into and served.

There were some special painted pieces for sale too – this table ($1800):

RC and Moon Pie Festival, Bell Buckle TN

Stool ($950/pr):

RC and Moon Pie Festival, Bell Buckle TN

Chair ($1400):

RC and Moon Pie Festival, Bell Buckle TN

Gosh you know I *loved* those and they’ve inspired me to take out my paints and do my own thing. It’s great that a lucky someone is getting to take these home!

Daddy of course snacked on a RC and a Moon Pie. Shug is *waaay* too little to enjoy them, but daddy put them on his stroller tray just for a pic, and look at what Shug went after!

Shug Likes RC and Moon Pies, RC and Moon Pie Festival, Bell Buckle TN

The White Lily Answer

White Lily

Thank you – thank you – thank you to Joanne, who emailed me with the answer to the code for Knoxville-milled White Lily!

Look for the “Best if used by” date stamp, like on my sack of flour above. Underneath the “best if” line is a series of numbers.

  • The first number indicates year. So this flour was milled in “8” = 2008.
  • The next three numbers indicate the day of the year. The 108th day of this year was April 17th.
  • The next three numbers indicate the plant code. The Knoxville code is/was 569.

Joanne – really – (and I am sending you an email back too, but…) thank you soooo much!!

White Lily Update

(original post)

I was so tickled to get all those emails about those of you also being interested in buying Knoxville-milled White Lily at the store before it’s all gone!

I didn’t get a response to the email I sent White Lily on Wednesday. This was the message I had sent them:

Hi – I understand that the White Lily mill in Knoxville is closing, and I want to stock up on it so that I can avoid the new flour being milled up north. I plan to purchase several, several, several bags this weekend. Can you please tell me how I can differentiate on the bag between the flour made in Knoxville and that made elsewhere?

So…I decided to call them. I talked to Lori Ann, and asked her to please tell me the code on the bags of White Lily for the Knoxville mill. She wouldn’t tell me the code (and, really, you *know* they have a code on those bags because of all the food recalls that go on, so the FDA and whoever else can trace tainted ingredients back to their source. We aren’t talking produce w/out barcodes.) but she *did* say that everything that is on store shelves right now was milled in Knoxville.

I told her it was my understanding that the mills up north were already making White Lily. Does that mean that those mills haven’t started shipping the flour yet? She didn’t answer that but again said that everything that is on the store shelves right now is from Knoxville.

Really, I would be happy with that explanation but I don’t understand why I couldn’t just get the code so I would know that the ‘x’ number of bags I buy this weekend really are from Knoxville. You know?

She added that there was no way I would be able to tell the difference between Knoxville White Lily and the newly made flour anyway.

Well, I couldn’t help myself, so I very nicely asked her if she read the article in the NY Times which says that two other sources could tell the difference. She said that it was a (okay, yes! I did take notes!! you know me!!) “flawed test” and that one of the testers was a “former employee” so there you go.

I told her that the other tester, though, was not employed by the company and she gave me the pause. You know, …….the pause…….. After a few seconds, she said that they had a “lady in their kitchen that worked there over 14 years that could not tell the difference” and that the color change between Knoxville and the other mill was due to the fact that “flour changes color in age” meaning I guess that the other mill’s flour may have been older than the comparison from Knoxville. So how long then has the other mill been making White Lily without shipping it since everything on store shelves right now is from Knoxville? I’m not sure how much sense that makes.

Lori Ann was really nice and I thanked her for helping me. I do wish that she would have just told me that code, though! Maybe they aren’t supposed to because then they would have so many people wanting to stock up and freeze Knoxville flour. Of course, they are still making money on any sales no matter where the flour originated, so…not sure that makes any difference either…

It sounds like their office has had a *lot* of calls about this. If anyone else has any questions – or wants to try to get the code(!!) – their # is 800.595.1380. You have to promise me you’ll email me if you get it! hahaha!!

—
Updated: got the code!

Fried Pickles

Last night for supper, I made up some fish, and to go along with it, fried pickles.

Av loves fried pickles…

His favorites are from Ezell’s Fish Camp in Lavaca, Alabama:
Fried Pickles at Ezell's Fish Camp, Lavaca AL

These are from somewhere else…not quite as good because they’re so thin and there’s so much extra crust:
Fried Pickles

These were a mostly cornmeal crust:
Fried Pickles

These came from a barbecue place in Fultondale, Alabama where they fry the whole spear:
Fried Pickles, Porky's Pride BBQ, Fultondale AL

The secret to really good fried pickles is that the pickles are cut thick enough to stay “pickley” and of course that they not at all be greasy. These turn out great…

  • In a skillet, put oil on to 350*.
  • Prepare a plate with paper toweling so the finished pickles can drain well, and set the oven to 200* so that if you’re doing several batches, or if they will be done a little earlier than other things, they can stay nice and warm.
  • For every two people, you need one whole pickle (if you’re serving this as a side dish). For this recipe, I really suggest Claussen because they really do stay crisp. Cut into nice-size piec

Fried Pickles

  • The egg wash ratio is: one egg to one cup of milk. This egg wash is enough for at least six or seven pickles (12-14 servings):

Fried Pickles

  • In a Ziploc bag, put enough flour (or cornmeal, or a ratio of cornmeal to flour that you like) to coat the number of pickles you’re cooking plus seasoning – the amount of seasoning is going to be different for every family according to taste…but we like things pretty spiced-up, so I put several great-big dashes of Tony Chachere’s in the bag. If I weren’t using Tony Chachere’s, it would be something like cayenne pepper plus garlic salt and pepper. None of this is exact – it’s just whatever looks and sounds good:

Fried Pickles

  • Put the pickle pieces in the egg wash:

Fried Pickles

  • Remove them with a slotted spoon so the extra egg wash can drip off, then place the pickles in the ziploc bag and shake to coat. Shake, shake, shake.
  • Make sure the oil is at 350* (if you put them in at a lower temperature, they will soak up the oil). Lift each pickle piece out of the bag separately and gently place in the skillet to fry:

Fried Pickles

I use an electric skillet to fry in sometimes, just to make certain the oil is kept at a certain temperature without me having to think too much about it.

The pickles only take a few minutes on each side (get one side golden brown, then flip to the other side). Place the finished pickles on the plate with the paper toweling, and place that in the 200* oven to stay nice and warm while everything else finishes.

Fried Pickles, Y'all

Oh these turn out so great! Super-crisp and not at all greasy. Yum!

If these are for an appetizer, they can be served with a nice dip – remoulade or comeback sauce is nice.

Salt and Pepper Shaker Tassel

Salt and Pepper Shaker Tassel

Last year, there was an article in Mississippi Magazine about salt and pepper shaker tassels. All you do is just take an old salt or pepper shaker, thread a cord in the top, and put a tassel in the other end.

Supplies:
shaker with a hole in the bottom (so those screw-cap ones obv. won’t work)
either skinny gold cord, or embroidery thread & embroidery needle
various ribbons (or you can use yarn, etc)
hot glue

This project is *so* much easier if you use a shaker that is short, because you won’t have a hard time getting the cord or thread to go through the top holes and down to where you can reach it on the bottom. If you use really tall shakers like these:

Salt and Pepper Tassel

…it’s a lot more difficult (these are 4″ tall) and rather than tying a knot in the cord, I’ve had to glue the cord to stay put. It still looks good, but you just have to be careful to do a very neat job hot gluing.

The shakers must have a hole in the bottom so you’ll have a place to nest the tassel:

Salt and Pepper Tassel

To make the hanger, I took embroidery thread and put it on a long needle to get it to go from the bottom of the shaker, through one of the top holes, and down through the other.

Salt and Pepper Tassel

Salt and Pepper Tassel

I placed little tiny dabs of hot glue at each hole in the top of the shaker to secure the thread. I flattened out the glue while it was still hot so it would look neat and not at all noticeable.

I like brown and turquoise together, so I got five different patterns of brown ribbon:

Salt and Pepper Tassel

…and cut them all either 12″ or 13″ long so there would be some variation. I wanted the ribbons to hang somewhere around 150% the length of the shaker (so since the shaker is 4″ long and once the tassel is made the 12″ strips will be folded in half to be 6″ long, that pretty much works out).

For this tassel, I cut seventeen strips of ribbon. Some ribbon patterns I only cut two of and others (like the skinny one) I cut more. Here are all the strips laid out:
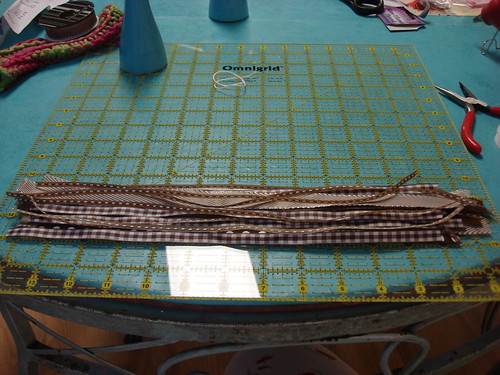
Salt and Pepper Tassel

I put a new long skinny ribbon underneath all the others, right in the middle, and knotted it:

Salt and Pepper Tassel

Then I pulled down both sides and knotted that with a new piece of skinny ribbon to make the tassel shape:

Salt and Pepper Tassel

I stuffed the top of the tassel in the shaker bottom (and neatly hot glued around the inside there to make it secure):

Salt and Pepper Tassel

Cut fish-tails into the large ribbon ends (I left the small and medium-width ribbons flat since they won’t unravel):

Salt and Pepper Tassel

Fluffed it all out a bit, and here it is!:

Salt and Pepper Tassel