Hampton Inn & Suites Nashville – At the University

We were staying just one night in Nashville, getting in late and leaving early, so we decided to just stay at a Hampton and save a little money. This one is the “at the University” Hampton – so close to Vanderbilt that they asked Av to sign a statement that there wouldn’t be any partying or more than four people in a room. Sounds like Panama City…

Anyway, the hotel was pretty nice, about the same as all other Hamptons except the rooms were a little bit smaller and the coffee table in front of the couch was more like one of those Lack side tables at Ikea (although faux wood-grained) rather than a coffee table…
Hotel Room, Hampton Inn & Suites at the University, Nashville TN
This hotel had the new “Cloud Nine Bed Experience” which is new, but it’s sure not the “Heavenly Bed” at the Westin. The mattress was *very* firm. The pillows seemed firmer than the average pillow, too.

Bathroom, Hampton Inn & Suites at the University, Nashville TN
(Above:) Here’s a pic of the bathroom.

Overall, everything was okay, and if we were in the same situation, just needing a place to sleep rather than stay a couple of days in Nashville, we might stay here again.

Making Chanukah Beeswax Candles

This Chanukah, I really wanted to try making my own beeswax candles for the menorahs. We have some really pretty dipped wax candles, but beeswax is a little different because it burns longer than other similarly-sized candles, it doesn’t put off any smoke, and it doesn’t drip wax – which is a big advantage, I think.

Hobby Lobby had sheets of beeswax – they were selling two sheets of 8″x16-1/2″ sheets per pack. Some wick was included in the pack, but I went ahead and bought more to make certain I had enough for the project (the wick labels will indicate what size is best).
Making Beeswax Candles 2

(Below:) Here’s what I used: a menorah to make sure I was making the candles the correct thickness (but beeswax is so forgiving…you can just pinch it to make it fit if it isn’t exact the first time), the beeswax, a hairdryer (to make the wax pliable – but it really wasn’t necessary), scissors to cut the wax, wick, and an old Martha Stewart magazine that gave dimensions to cut the wax sheets. I cut the wax into 4″x2″ sheets and was able to make about 32 candles.
Making Beeswax Candles 1

Next, just cut the wick a bit longer than the wax sheet…about 5″, and make a little knot at one of the ends of the wick:
Making Beeswax Candles 3

Lay the wick at one edge of the beeswax, and just roll it (pretty tightly, but not tight enough to break the wax) all the way to the other side. I just used my fingers to rub the seam of the finished candle so that it wasn’t noticeable.
Making Beeswax Candles 4

Here they are, all piled up. The two sheets of beeswax made about 32 candles:
Making Beeswax Candles 5

…and here they are! The candles burned for about 45 minutes (they have to last at least 30 minutes according to minhag), and they were so pretty! Now I’m thinking about making Shabbos candles with beeswax, and some other ideas.
Making Beeswax Candles 6

Make-Your-Own Soap

I just discovered Hobby Lobby last week…I’m familiar with Michael’s, and I’ve been to A.C. Moore a couple of times, but Hobby Lobby seems to have soooo much more selection…

Anyway, I’ve been wanting to try make-your-own glycerin soap – it’s also called melt and pour soap. I’m not really interested in making the soap that requires lye (what some people refer to as *real* soap) because you have to be super-exact in making it, and it is dangerous if you’re not careful. I like the idea of using glycerin soap because it seems very easy to work with and because you can still do really fun things with it like add colors, fragrances, exfoliants, and other things that you might want to suspend in the soap.

Hobby Lobby had this bag (below) of pure glycerin soap in a 32oz. size for a little under $6. I got one bag and a tiny bottle of fragrance (I used honey almond).

All you do is put a few of the glycerin blocks into a microwave-safe bowl, and microwave for 30 seconds, then 15 or 20 second intervals until it’s all melted:
Make Your Own Glycerin Soap 1

I try to keep some chopsticks around so that I can use them for things like this (stirring) and just throw them away later…this is the part of the process that I put in the fragrance (just a few drops per ounce of soap that was melted):
Make Your Own Glycerin Soap 2

Once the soap was all melted, I opened up an empty, thoroughly cleaned container of eggnog (yum!), because I figured this was the perfect size to cut bars of soap from.
Make Your Own Glycerin Soap 3

I just poured the melted soap into the carton, then waited about two hours:
Make Your Own Glycerin Soap 4

…I stripped the carton away from the now-solid soap:
Make Your Own Glycerin Soap 5

…and cut the molded soap into bars. I just used a regular chef’s knife and cut the block into about four bars (very easy to slice through). They smell and look great, and I think they’ll make nice presents for friends (I’m making several small things to combine). I’ll just need to wrap each bar in some cellophane, and I think they’ll be a big hit!

Now that I’ve got the hang of this, I think next time I might try adding some ground outmeal, or some lavender, or some….hmmmm……
Make Your Own Glycerin Soap 6
There are several, several really neat websites about making soap — here are a couple:

Teach Soap
Bramble Berry

Round Feather Wreath

I made this for a baby announcement…

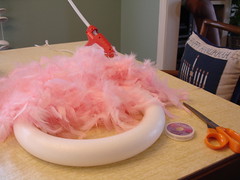
While I was at Jo-Ann Fabrics/Crafts in Mobile, I bought a 12″ white styrofoam wreath form and two pink feather boas. The only other thing I needed for the project was my clear jewelry string, scissors, and hot glue gun.
Making a Feather Wreath 1

I just tied the clear jewelry string to one end of the boa, and tied that to the wreath (I hot-glued these knots to make extra-sure they stayed).
Making a Feather Wreath 2

…then I just wrapped the boa around and around and around the wreath form until I got to the end of it, and just tied the end to the beginning of another boa with more clear jewelry string (again, hot-gluing the knot):
Making a Feather Wreath 3

All done! I might just need to trim it up in the center with my scissors, but I think it looks really great (like my other feather wreath, though, for some reason it looks so much better and fun in person than in my pictures):
Making a Feather Wreath 4

Forcing Paperwhites Update

It’s been just a little over a month since my last post about forcing paperwhites (here), and they’re now blooming, and smell *wonderful*!
Paperwhites Blooming 2

Paperwhites Blooming 1

…and now it’s time for me to force more of the bulbs, and some of these I’ll be giving as gifts. All I’ll need to do is to pop the top on the jars and wrap a pretty bow around them, with instructions to just make sure the water stays constant at the very bottom of the bulb. I did this a few years ago at my office and it was neat to go into my friends’ offices and see (and smell) their pretty paperwhites bloom!
Forcing Paperwhites

The First Cocktail : Sazerac

Av and I made Sazeracs at home this week…and they were really nice! I got the recipe from our Arnaud’s cookbook, where it says that the Sazerac was the first cocktail, and that it was invented in New Orleans by Antoine Amedee Peychaud (who invented Peychaud’s Bitters).

The ingredients for one glass are:
2 oz. rye whiskey
3 dashes Peychaud’s bitters (if you don’t have Peychaud’s, you can double the Angostura)
3 dashes Angostura bitters
splash of water
2 dashes of Herbsaint or Pernod liqueur
twist of lemon
1 tsp Simple Syrup

To make the simple syrup, just put into a small saucepan regular white granulated sugar and water – at a ratio of 2 portions sugar to every one portion of water. I went ahead and made a small batch (2 cups of sugar to 1 cup of water), because it will keep in the refrigerator for a while. Just cook the sugar-water mixture on the stove, stirring with a wooden spoon, until the sugar completely dissolves – this just takes a few minutes on medium heat. Make sure it cools to room temperature before you use it in any cocktail recipe.
Simple Syrup

Here in the shaker is ice (fill the shaker about half-full), the whiskey, simple syrup, both bitters, and the water. Make sure it combines well.
Making Sazeracs 2

The next step is to take the Herbsaint, pour enough into the glass to coat the interior (just swirl it all around the glass), then pour out what’s left.
Making Sazeracs

Pour the strained drink mixture from the shaker to each glass (we made the recipe 2x for two servings), and pop in a lemon twist. Perfect!
Sazeracs

A little different recipe can be found at the Peychaud’s Bitters website here, and we’ll try it that method next time.