Hampton Inn, Laurel MS

This was our first time at the Hampton Inn in Laurel. It really is one of the less-nice Hamptons that we’ve been to (due to some cleanliness “issues” in the shower, and oddly the maid leaving us a 1/2-full bottle of lotion on the sink counter).

Hampton Inn, Laurel MS

This is about it as far as choices go in Laurel, though….I tried to reserve us a room in Hattiesburg but every room in the nicer hotels there was booked up. Above is a pic of the room, which was pretty average.

Pecan Encrusted Hawaiian Sunfish with Teriyaki Green Beans and Baked Grits

Originally, I meant to cook some nice Gulf snapper for supper last night, but the place where I buy fish was out (I think there’s something going on right now with the snapper market) and it was suggested that I try my recipe with Hawaiian Sunfish, which I think is a nice way of saying ’tilapia’. I love snapper and for some reason I have this idea that tilapia is a boring fish, but it tasted really nice anyway, and supper turned out great.

Baked Grits
Ingredients:
1 c. dry grits
5 c. water
2 tbsp butter
salt, pepper

Also for this recipe:ramekin dishes (butter them)

First, I started the grits (the ones I got from the Kymulga mill) – one cup of dry grits takes a little over an hour to cook. For every one cup of grits, add them to five cups of boiling water and a couple of tablespoons of butter. Add salt and pepper.

Bring it all to a boil, then put the heat down to medium-low and let cook for as long as it takes (generally about an hour or so), stirring pretty often.

Here they are, almost done:

Pecan Encrusted Hawaiian Sunfish with Teriyaki Green Beans and Baked Grits

Once they’re ready, butter some ramekins (we only needed two, but 1 cup of grits makes enough for six or eight ramekins), fill with grits to about 3/4 full, and set the filled ramekins in an ovenproof dish with water to reach half of the way up.

Preheat the oven to 375* and bake 20 minutes covered with foil, then another 25 or so minutes with the foil removed. This will give the top of the grits (which will be the bottom once it’s served) a nice crust.

In the meantime, I just sauteed my green beans, added some teriyaki sauce to them, and put the heat down to medium-low. This let the beans soak up the teriyaki flavor while I started the fish.

Pecan Encrusted Hawaiian Sunfish with Teriyaki Green Beans and Baked Grits

Pecan Encrusted Hawaiian Sunfish/Tilapia (or Snapper)
This recipe is based on, but isn’t exactly, the recipe in the Prejean’s cookbook.

Ingredients:
2 c. pecan meal (I get mine from Priester’s Pecans in Fort Deposit, but it’s just as easy to make it yourself by processing pecan halves in a food processor)
3/4 c. flour
1 tsp. cumin
salt, black pepper
3 tsp. cayenne
1/3 tsp. garlic powder
1/4 tsp each: dried thyme, oregano, basil
few dashes (as much or as little as you like) of Rex Blackened Seasoning
2 fish filets (tilapia or snapper)
butter for sauteeing the fish
a little warm, clarified butter to dip each of the filets in for breading

Directions:
Mix together all the dry ingredients. Dip each of the filets in warm, clarified butter, then dredge in the breading to coat both sides well.

Melt butter in large pan for sauteeing.

Add the fish and cook on medium-high, depending on thickness of the filets, about 2-1/2 to 3-1/2 minutes on each side.

Once the baked grits were ready, I took a knife and went around the inside of each of the ramekins to loosen the grits. I inverted one ramekin on each of the plates, and the grits came out with no problem!

Pecan Encrusted Hawaiian Sunfish with Teriyaki Green Beans and Baked Grits

Then, I placed each filet over the baked grits, and surrounded that with my green beans.

Pecan Encrusted Hawaiian Sunfish with Teriyaki Green Beans and Baked Grits

Yum!

Kymulga Mill and Covered Bridge, Childersburg AL

Av and I also visited the Kymulga Mill and Covered Bridge on Sunday. It’s sooo beautiful.

Kymulga Covered Bridge, Childersburg AL

Inside the mill, the gentleman who runs the mill park took us for a little tour and explained the history and the entire process of how everything at the mill worked, from start to finish. The person who had the mill built was Confederate Army Captain Forney, and the contractor was G.E. Morris, who was building three other mills at the time. Captain Forney died before it was completed (it was completed in 1864), and after his family there have been three or four other owners since.

The covered bridge is it’s 105′ long, and cars can’t go over it any more. It goes across the Talladega Creek, and was built in 1861.

All the pics are here in my Flickr set.

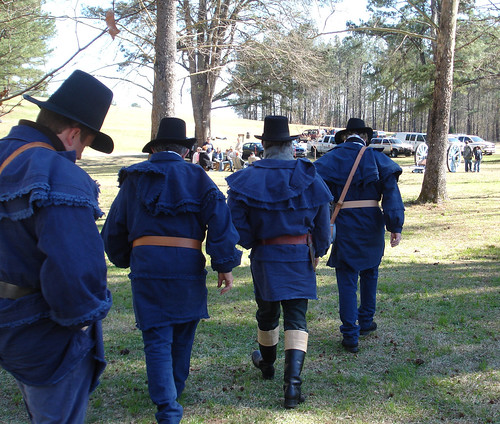
192nd Anniversary of the Battle of Horseshoe Bend

This weekend we went to the 192nd anniversary of the battle of Horseshoe Bend, which is not too far from Alexander City, AL. This is going to sound silly, but I grew up hearing about Horseshoe Bend and it never dawned on me that it happened in Alabama, or what the consequences were (for instance, 800 Upper Creeks died defending their property here, that Sam Houston fought and was wounded here by an arrow, that afterwards the Creek Nation surrendered 20+ million acres that helped form Alabama and Georgia, that it was this battle that helped catapult Andrew Jackson’s political career, that although the battle ended March 27, 1814 that it is still considered part of the ‘War of 1812’).

Reenactors at 192nd Anniversary of the Battle of Horseshoe Bend

Anyway, I really thought we were going to spend a relatively quiet weekend home, but then Sunday came, and we were in the mood to drive somewhere. I looked on the Alabama Tourism site, and the only other things going on really were a reenactment in Bridgeport and some plays that will be going on for several more days that we can catch later if we like (there are a couple of things I really want to see at the Shakespeare Festival, but that will probably be later in April). We decided to go to Horseshoe Bend and just see what they were doing…

At the festival, there were people who were teaching crafts like basketweaving (above), and demonstrating weaving (below), another who was showing how arrowheads are made. There was always a crowd around him – he taught himself how to make arrowheads, and made one while we were standing there. I don’t really know anything about arrowheads, but his demonstration was just really interesting.

This was nice to do once – but another thing we did on Sunday (even better) was a visit to the Kymulga mill and covered bridge. I’ll post that tomorrow. All the pics from Horseshoe Bend are here in my Flickr set.

Under the Stars

Beverly Drive-In Theatre, Hattiesburg MS
Above: a (not-so-great) pic I took of the Beverly Drive In in Hattiesburg.

Av and I were talking this weekend about how much fun it would be to watch a movie at a Drive In. We both went to drive ins when we were little, but it’s been since we were kids that either of us have been to one. I did a little research, and this website has a listing of all Drive Ins (open and closed), state-by-state. There are eleven open in Alabama, six in Georgia, none (!) in Louisiana, and three in Mississippi.

We’re going to try to get to one of them soon. Fun!

Welcome Mat Design

Oooooh…I am *so* ready for Spring! We’ve made a list of tasks to do around the house – I always like to get into the ‘Spring Cleaning’ thing really big. Av’s been doing some painting, and I took a bit of a break from organizing closets and that sort of thing to design my own Spring-y welcome mat. Here’s how it went:

I bought one welcome mat with no design on the top. My other materials were:
Spray paint primer in white
Spray paint in pink
Spray paint in lime green (of course, use whatever colors you like best)
Painter’s masking tape
Newspaper to put underneath rug and protect the grass from getting painted (this is an outside project)

First, I just laid newspaper out on the lawn for the mat to sit on top of:

Welcome Mat

Then, I sprayed the white primer all over the mat:

Welcome Mat

Once the primer was dry (about two hours in the sunshine), I took the painter’s masking tape and made stripes for my first color. I didn’t want them to be all the same size, so I taped off different widths:

Welcome Mat

I sprayed my first color – pink:

Welcome Mat

Once that was dry (another couple of hours), I lifted the tape – it looked really nice already!

Welcome Mat

Once that tape had been removed, I taped off the mat for my second color – the green. I did it so that between every green and pink stripe, there would be a stripe of white. In other words, I covered all of the existing pink stripes I had *plus* a little. This made sure there was a stripe of white between the two colors, so it would look neat in the end:

Welcome Mat

Then, I just sprayed the whole thing with the green paint:

Welcome Mat

After a couple of hours, I lifted the last of the tape, and here it is!

Welcome Mat

I think it looks really, really nice. I may try to make a couple of others as little presents – maybe get a little fancier with more colors, or stencil initials or words on the mats. I *really* like the way it turned out!